
What Is Acrylic Edge Painting?
Clear Acrylic, Colored Edges
& OEM Sample Checks
A sourcing guide to the material choice, artwork setup, production feasibility and sample checks behind clear acrylic with custom colored edges.
Keep the clear acrylic face and printed artwork.
Add color only to the narrow cut edge.
Build a visible product difference without switching to a tinted sheet.

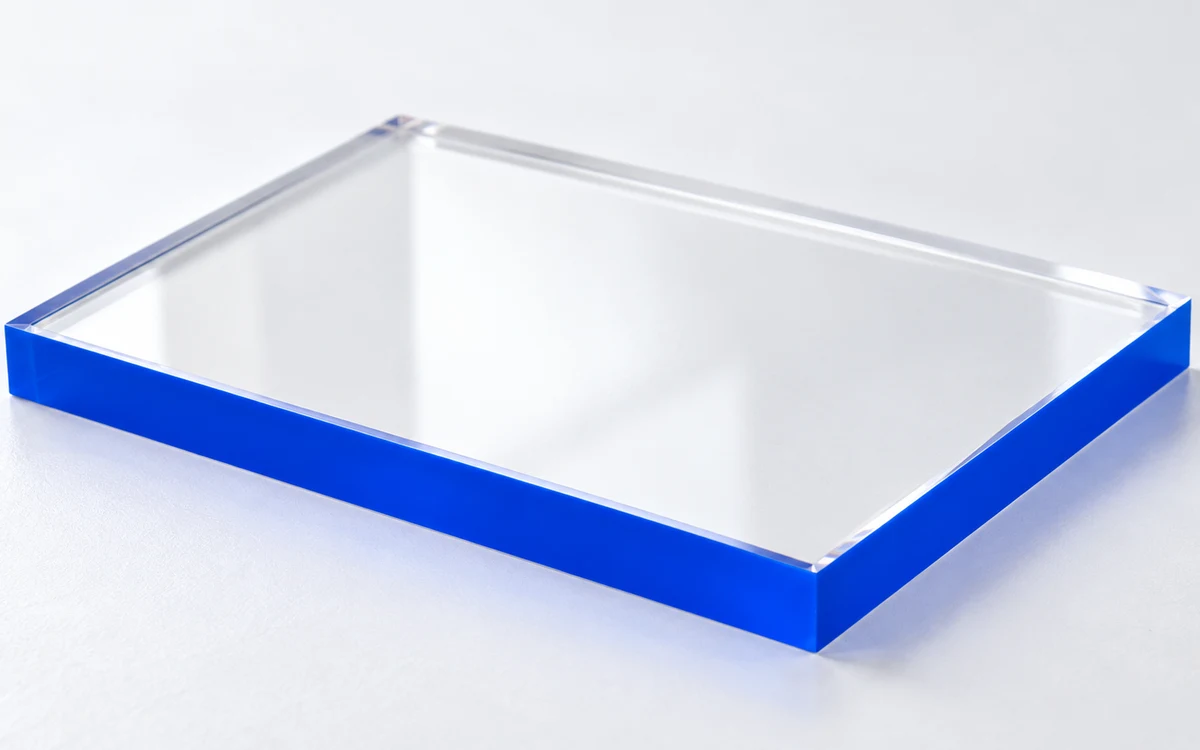
Acrylic edge painting is a secondary process that adds color only to the cut edge after a clear acrylic sheet has been printed and cut.
Four ways to create color on acrylic
These options can look similar in a product photo, but they use different materials and processes. Compare them before specifying a custom colored-edge acrylic product.
| Item | Post-applied edge painting | Edge-color acrylic sheet | Tinted acrylic | Surface printing only |
|---|---|---|---|---|
| 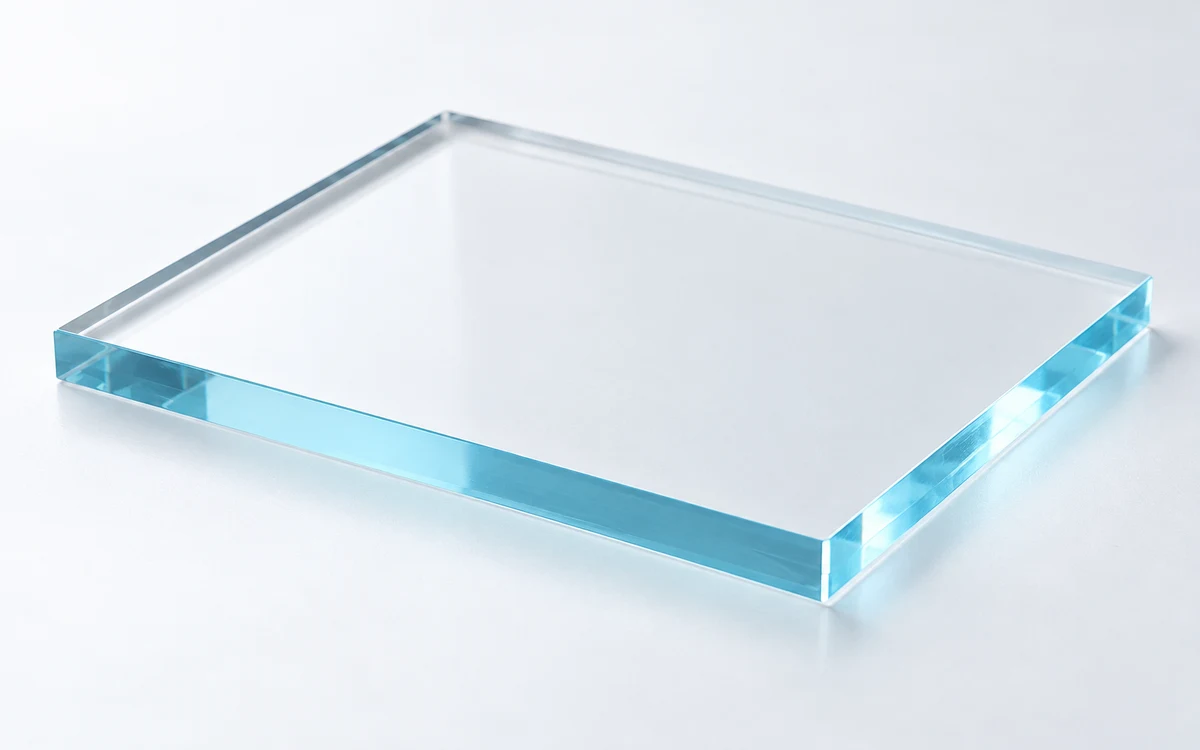 | 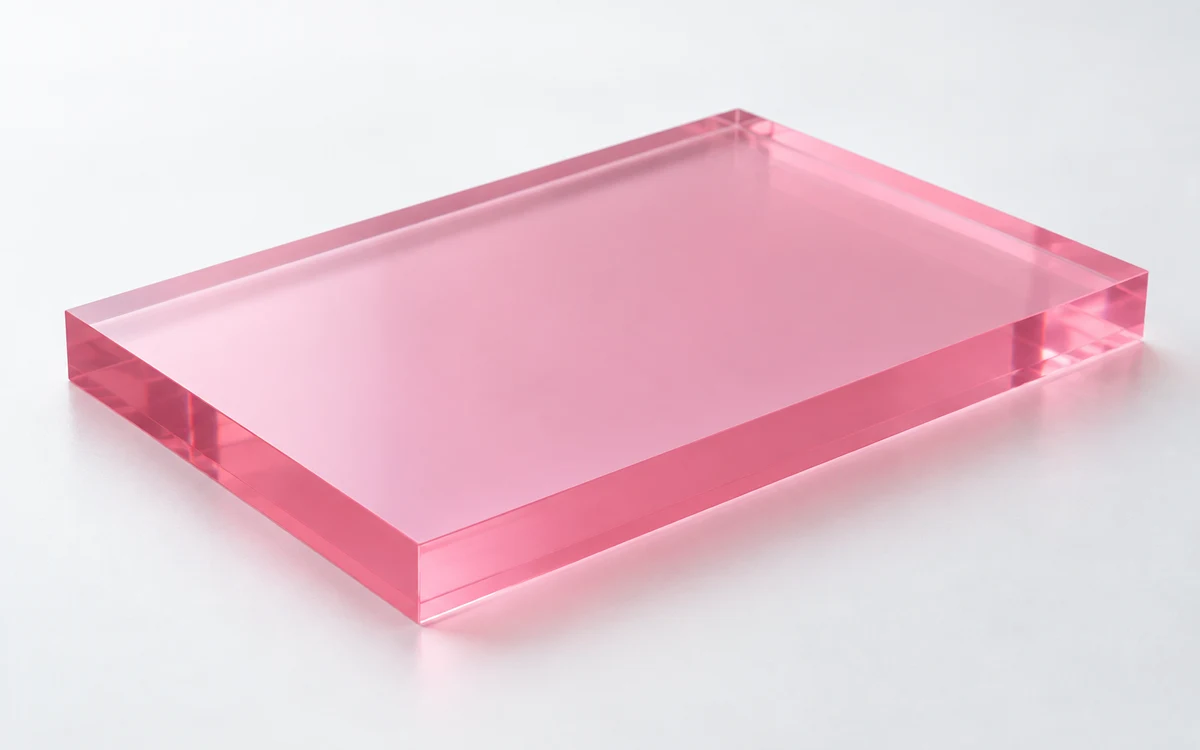 |  | |
| Visual result | Clear faces with color only on the cut edge | Clear face with a material-defined edge tint | The whole sheet is colored, not only the edge | Artwork on the face; the cut edge stays clear |
| Production method | Coating applied after printing and cutting | A stocked edge-color sheet is selected and cut | A colored sheet is printed and cut | White ink and color are UV printed on clear sheet |
| Buyer benefit | Keeps the clear-face look while adding a distinct accent | Useful when an available sheet color fits the project | Creates one consistent color across the full part | Reproduces detailed character and photo artwork |
| Typical use | Standees, charms and display pieces | Panels and displays using standard material colors | Keychains, plates and graphic shapes | Standard acrylic standees and keychains |
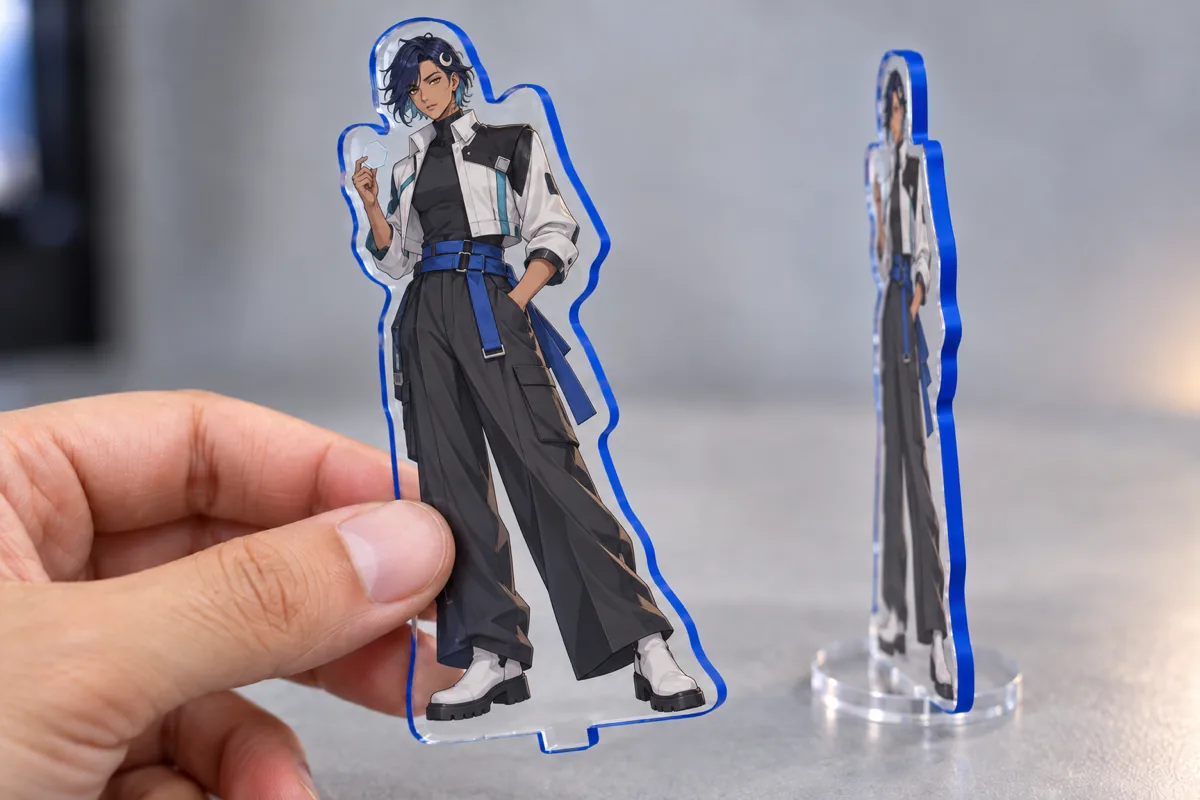
Five original characters, five edge-color SKUs
The clear face and printed character artwork stay consistent while the narrow edge changes to blue, pink, green, orange or violet.
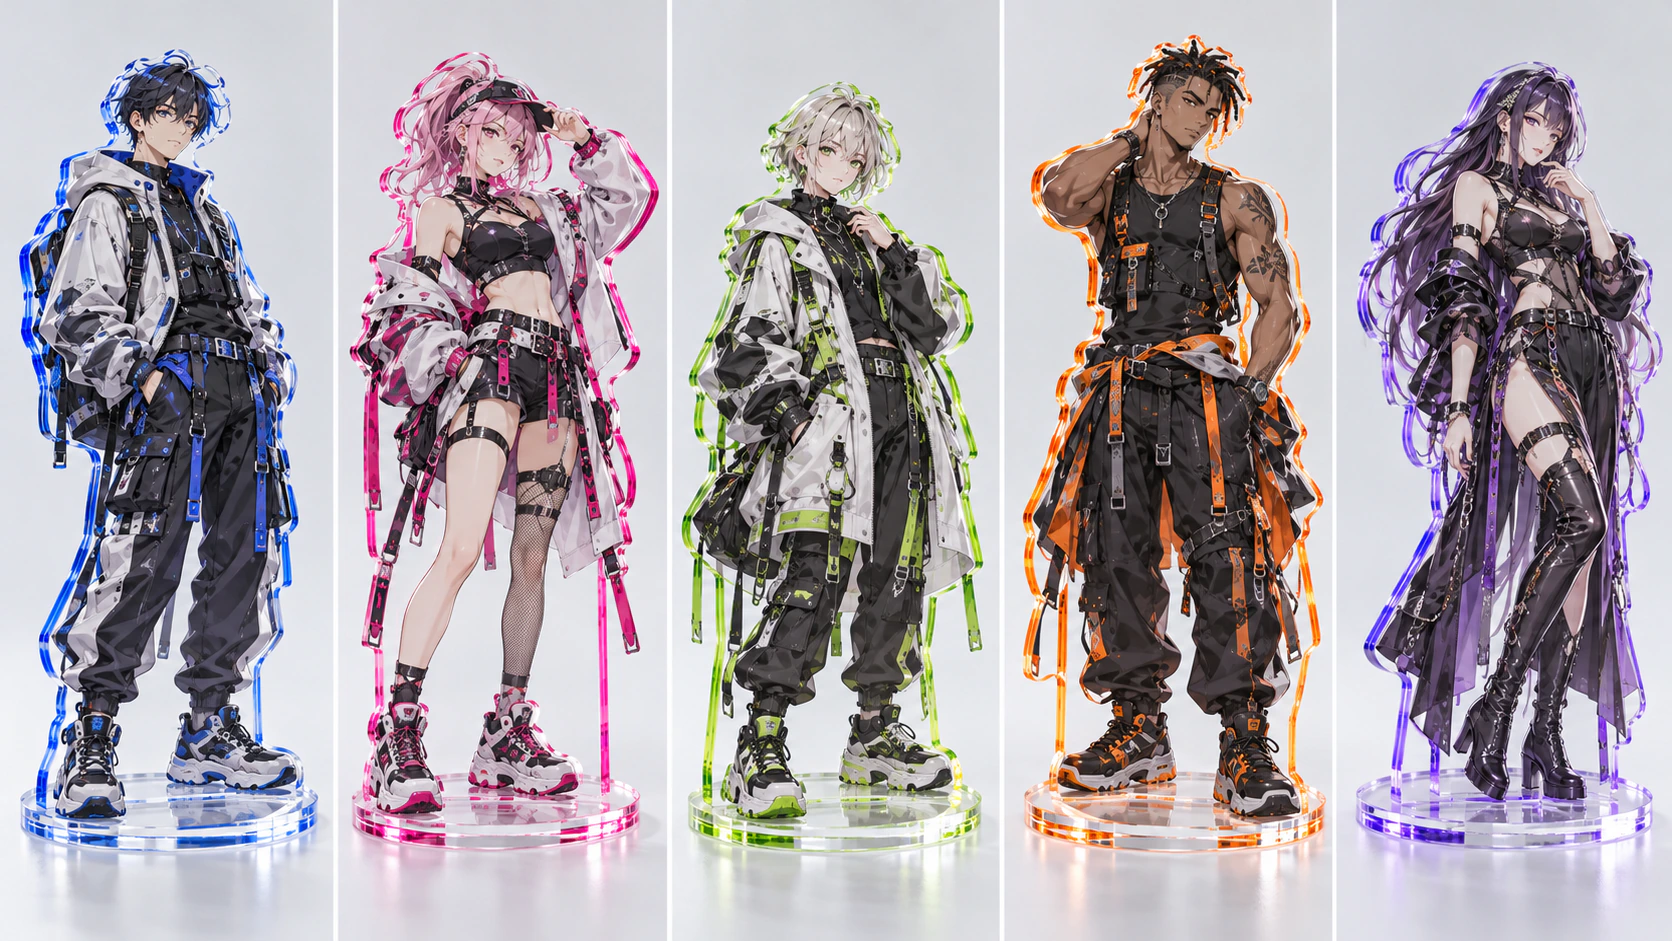
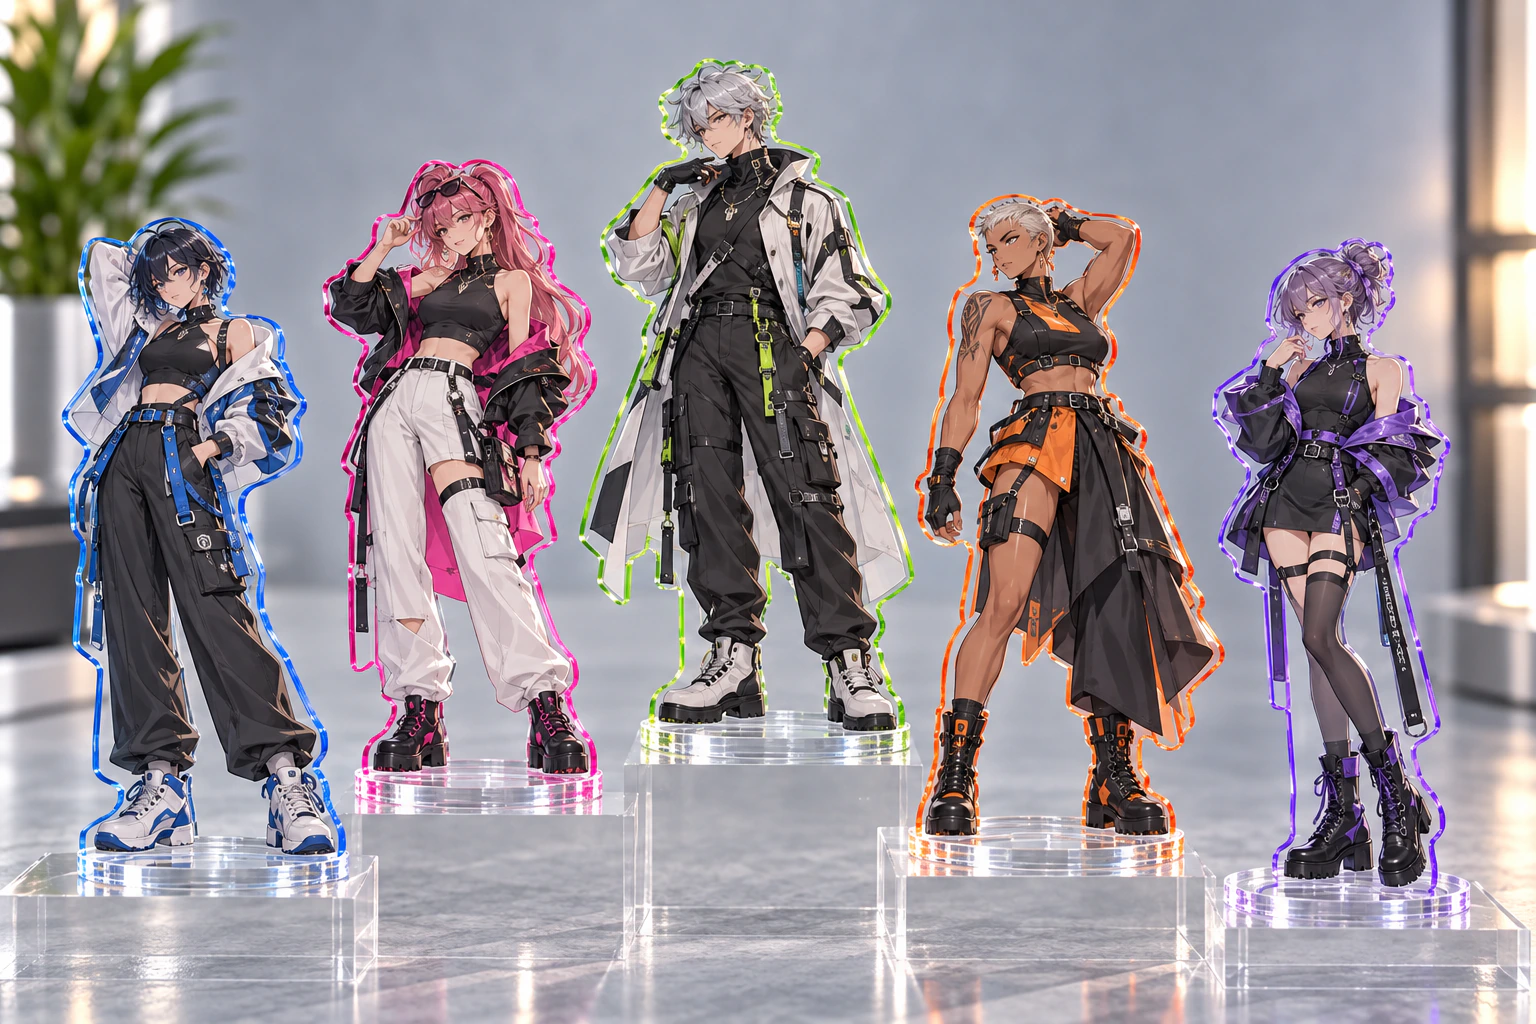
The collection keeps a consistent clear-acrylic look while each SKU stays visually identifiable.
Four procurement reasons to specify painted edges
Many suppliers compete through specialty sheets, added structures or printing effects. Edge painting gives buyers another design axis: the narrow cut edge.
Differentiate without tinting the clear face
Unlike a colored sheet, post-applied edge paint leaves the printed face and transparent margin visually clear while adding a controlled accent to the cut edge.
Use color as a practical SKU system
Blue, pink, green, orange or violet can be assigned to characters, teams or tiers, making multi-SKU displays, photography and packing checks easier to organize.
Add depth at oblique viewing angles
The front artwork stays dominant, while the colored edge becomes visible from the side. This gives product photography and retail displays an additional visual layer.
Approve print color and edge color separately
White ink, front printing, edge hue, density and boundary quality can be reviewed as separate checkpoints before a bulk-production sample is approved.
MARKET POSITION
How painted edges differ from common acrylic upgrades
Specialty sheets, layered structures, premium printing and retail packing are common ways to create a higher-spec acrylic item. Post-applied edge painting can complement those choices while leaving the clear face unchanged.
Holographic, iridescent and glitter materials change the appearance of the entire face.
Layers, moving parts and interchangeable pieces create depth or interaction.
Fine UV printing, double-sided art, custom contours and printed bases expand the graphic treatment.
SKU packing, backing cards and set assembly reduce work after delivery.
Use the cut edge as part of the product design
This is not a switch to colored sheet material. The face is printed on clear acrylic, cut to shape and then protected while the requested edge receives color.
Projects where color supports the selling story
- Collections that use several characters or team colors within one visual system
- Standard and limited editions that need an immediately explainable design difference
- Cyber, neon or technology-led concepts that should still keep a clear acrylic face
- Products whose side view, shelf display or photography matters as much as the front view
Projects with shape, color or use-condition constraints
- Shapes with tight internal corners, deep holes or narrow slots inside the painted scope
- Projects requiring an exact PANTONE or DIC appearance under every lighting condition
- Parts exposed to frequent rubbing, outdoor use or alcohol-based cleaning
- High-volume giveaways where the lowest unit cost matters more than an added finishing step
Which B2B buyers can use this finish?
The process is most useful when color already has a role in SKU planning, collection storytelling or retail presentation.
IP licensors and publishers
Teams planning character-based SKUs, anniversary editions or premium variants that need a visible reason to exist beside a standard standee.
Anime, game and VTuber teams
Merchandise planners who want member colors, attributes or factions reflected in the physical product, not only in the front artwork.
Event and live-goods buyers
Sourcing teams creating venue exclusives, tours or pop-up merchandise that should remain easy to identify across several colorways.
Promotional and sourcing agencies
Agencies looking for an additional finish they can propose without rebuilding the client’s approved artwork from scratch.
Private-label and ecommerce sellers
Retail buyers creating coordinated collections, blind-box assortments or limited drops with clearer SKU differentiation.
Product and industrial design studios
Designers adding a narrow brand-color accent to clear nameplates, tabletop graphics, prototypes or display components.
USE CASES
Where the effect adds value
Character color series
Assign one edge color to each character, member or team in the same product format.
Anniversary and venue editions
Create a visible distinction from the standard edition without replacing the clear substrate.
Blind assortments and prize goods
Use grade, faction or team colors as a practical visual cue during display and packing.
Pop-ups and retail displays
Let a narrow line of color appear from oblique angles and under directional lighting.
Brand and product displays
Carry a brand color onto the cut edge of a clear sign, nameplate or tabletop fixture.
Planning a hanging format? Review the size, hole and fitting options in our custom acrylic keychain OEM guide .
Production flow from clear sheet to finished goods
Edge painting is separate from front printing. Masking, coating conditions, drying and inspection all influence whether an approved sample can be repeated in bulk.
Separate the specifications
Define print, white ink, cut line, painted-edge scope and color reference as distinct items.
UV print the clear sheet
Apply the white layer and color artwork to the transparent acrylic face.
Cut and clean
Cut the contour, then control dust, oil and residue on the exposed edge.
Mask and fixture
Protect the clear faces and expose only the edge that will receive color.
Apply the edge coating
Control coating distance, passes and coverage to build a thin, even color layer.
Dry or cure
Hold the parts under suitable environmental and timing conditions for the selected coating system.
Inspect and pack
Check appearance, adhesion and fit, then prevent surface-to-surface abrasion during packing.
PRODUCTION ENVIRONMENT
What to verify with the manufacturing team
Ask how the supplier protects transparent surfaces and controls repeatability, not only whether a coating booth exists.
Controlled coating and extraction area
Overspray should be contained so mist does not settle on the transparent faces.
Clean preparation zone
Dust, cutting residue and oil must be removed before coating to reduce contamination and surface defects.
Temperature, humidity and drying control
The supplier should define working conditions and enough drying time for the chosen materials.
Standard light and approved reference
Edge hue, density and acceptability should be compared under the same background and lighting conditions.
Compatible shapes and processing
Feasibility depends on access to every specified edge, especially around narrow internal features.
Custom contour cutting
(character and logo outlines)
Drilled holes
(keychains and charms)
Rounded corners and notches
(R-corners and C-notches)
Base slots
(standee insertion points)
RFQ checklist
Send these inputs together so feasibility, sampling and quotation can be reviewed on the same scope.
- Finished width and height
- Acrylic thickness, such as 3 mm or 5 mm
- Vector cut line in AI or PDF format
- Requested edge color and a PANTONE, DIC or physical reference if available
- Total quantity, SKU count and quantity per SKU
- Individual, set or retail packaging requirements
- Required use date or target delivery window
- Print artwork and white-ink layer status
Six sample-approval checkpoints
Approve the actual sample before bulk production and record both acceptable appearance and reject conditions.
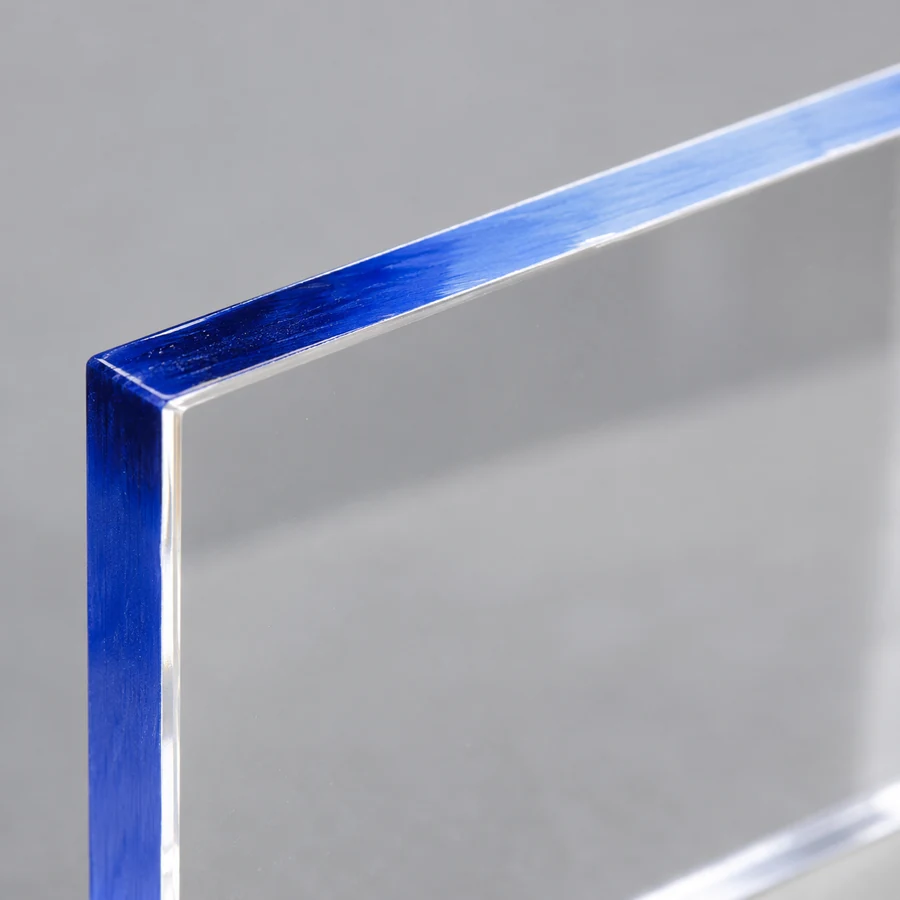
Color uniformity
Check for visible density or film-thickness variation.
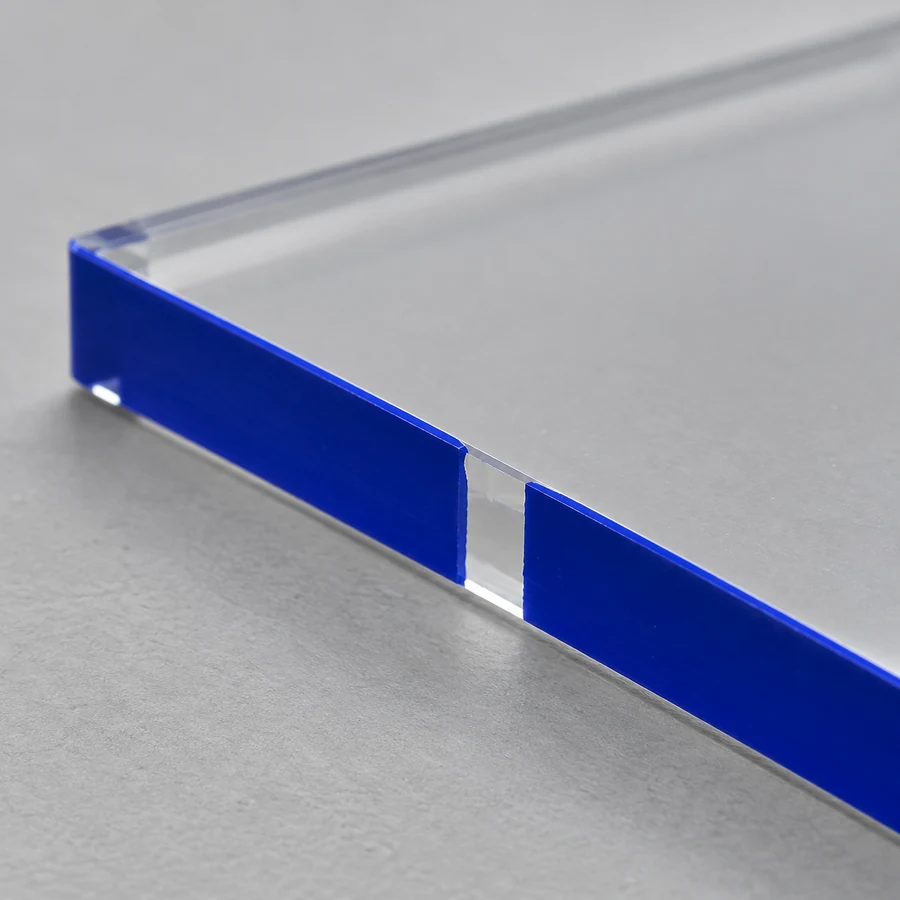
Missed coverage
Check for clear, uncoated areas within the specified edge.
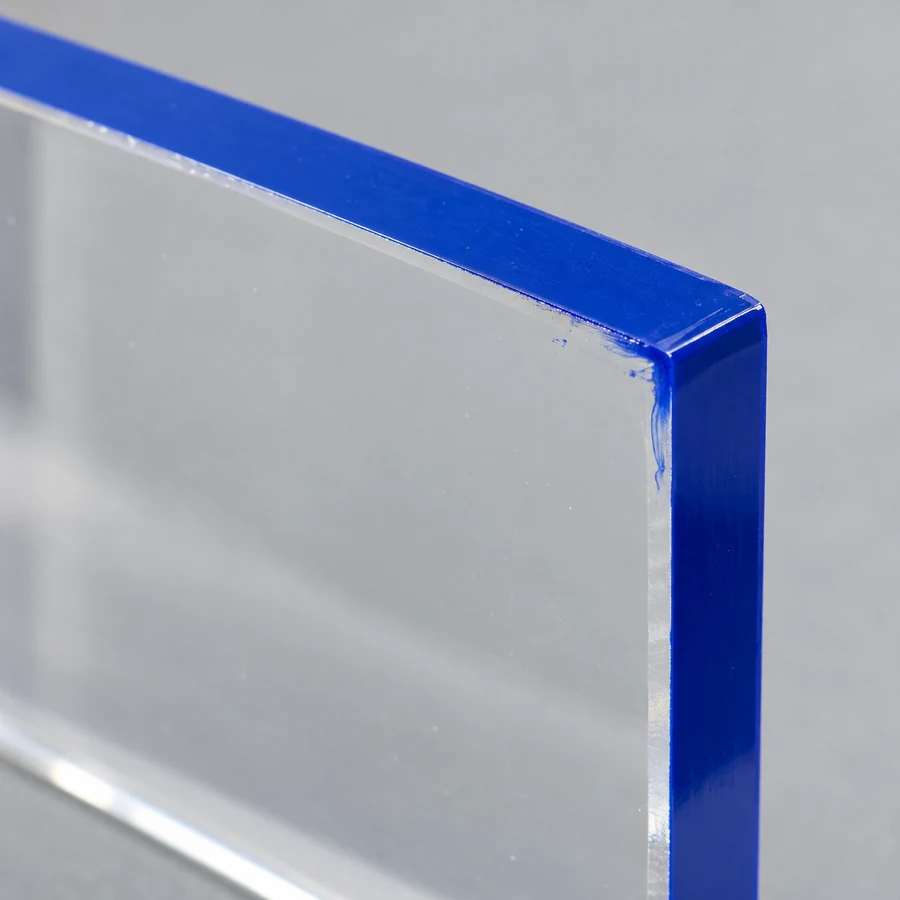
Boundary bleed
Check whether color has wrapped onto the printed face.
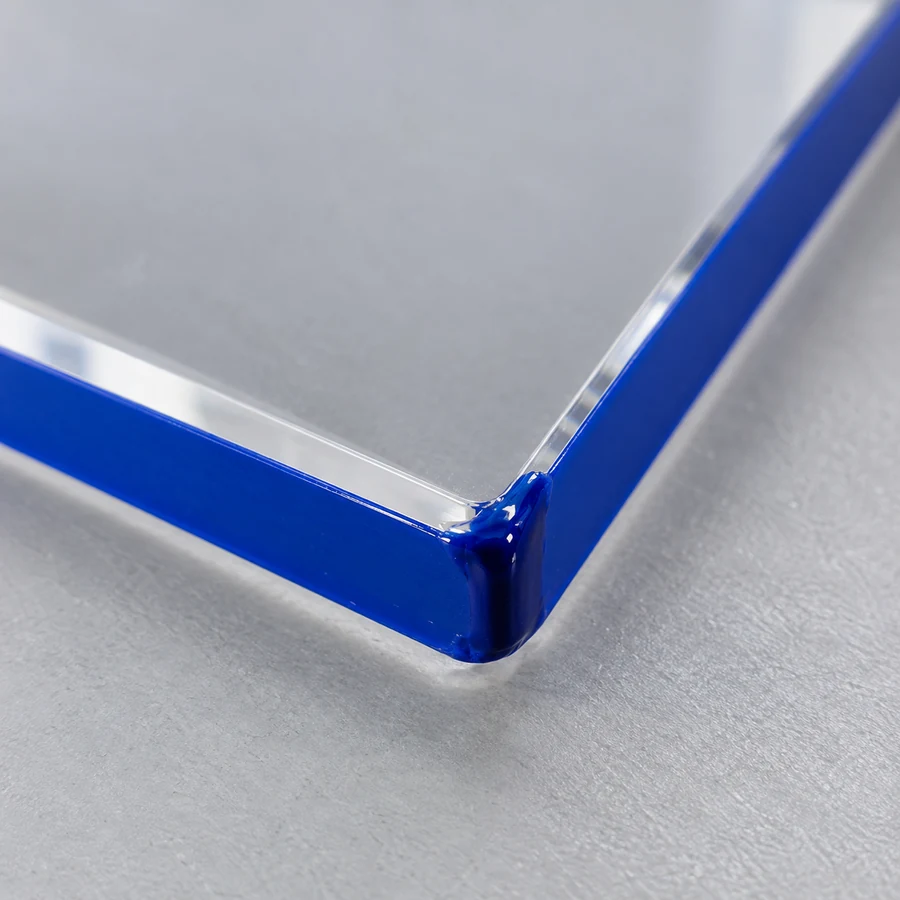
Corner buildup
Check outer corners for heavy deposits, pooling or runs.
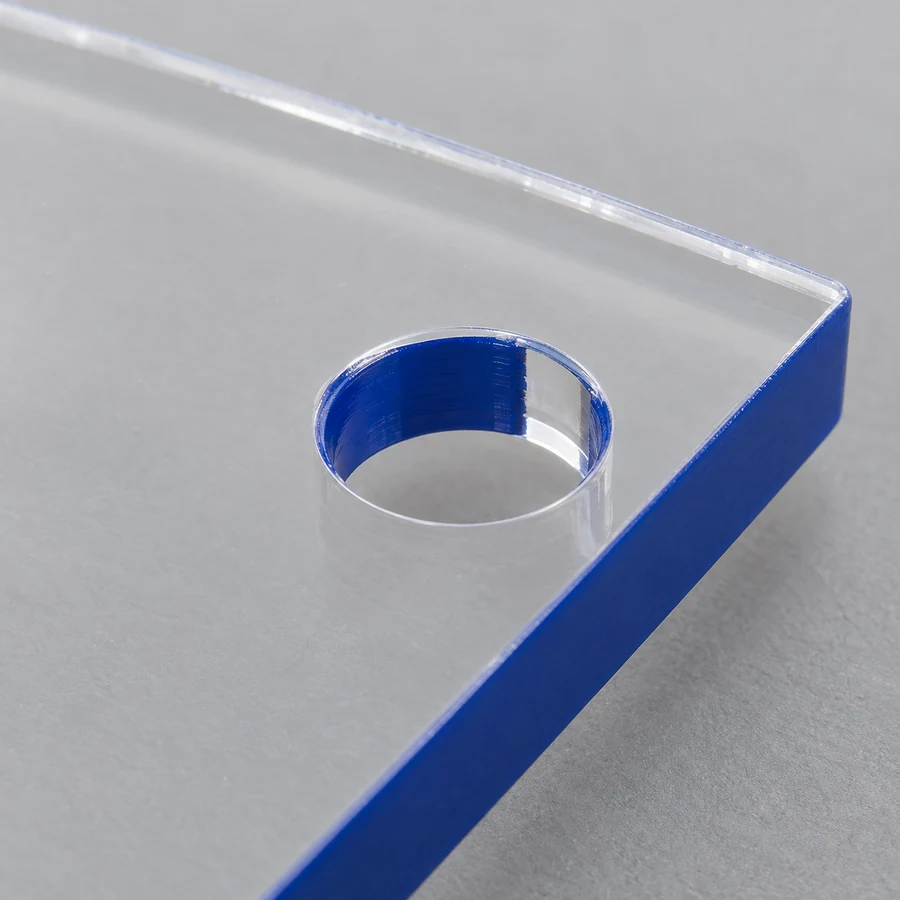
Hole coverage
Confirm whether internal walls match the approved coating scope.
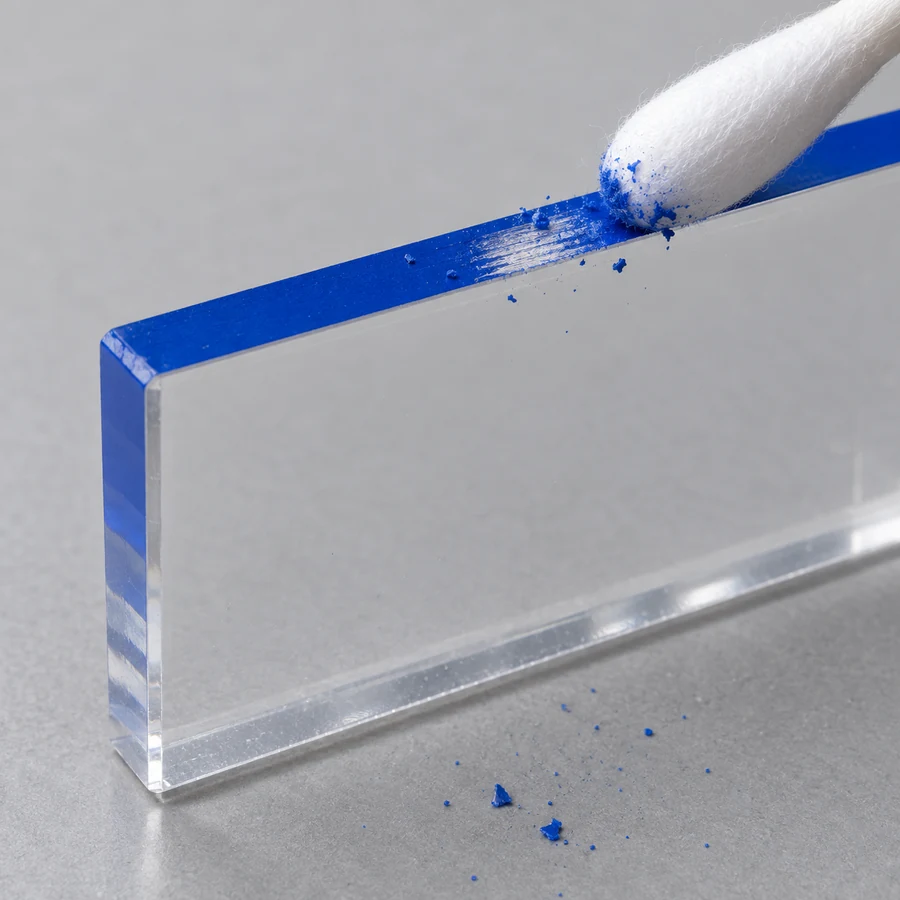
Adhesion and rub risk
Review peeling, color transfer and contact points after handling.
OEM PROJECT REVIEW
Send the artwork, cut line and edge-color reference
We can review feasibility, clarify the specification and scope the sample before bulk production.Artwork and RFQ inputs for sampling
Front printing and edge painting are different operations. Separating the data and manufacturing conditions makes quotation and sample approval easier to compare.
Print layer
Separate character art, background art and areas that must remain transparent.
White-ink layer
Specify where white ink sits below the color artwork as an independent layer.
Cut line
Create vector paths for the finished contour, holes and base slots.
Painted-edge scope
Show whether the edge is fully or partially painted and mark clear start and end points.
Color reference
Share a PANTONE, DIC, physical sample or another agreed reference for the requested direction.
Dimensions and thickness
State finished size, sheet thickness, hole diameter, slot size and minimum feature width.
Quantity and SKU matrix
List each SKU, edge color, order quantity and shared components in one table.
Packing and required date
Define individual packing, backing cards, set contents and the intended use date.
For layer setup, see the acrylic goods artwork data guide . For substrate selection, compare the six acrylic sheet types .
Quality criteria to fix before bulk production
A color code alone does not define the finished result. Use the approved sample, viewing conditions and agreed limits together.
Coating condition
- Hue and density
- Uniformity and coverage
- Corner buildup
Boundary and appearance
- Bleed onto the face
- Partial-paint boundary position
- Dirt and scratches
Shape and fit
- Hole and slot dimensions
- Base insertion
- Interference with fittings
Approved-sample comparison
- Same light and background
- Limit samples where needed
- SKU-level inspection records
For print and edge-color approval, read our acrylic color-difference control guide . For inspection planning, use the acrylic goods quality inspection guide .
Acrylic edge painting questions from OEM buyers
Q01Is acrylic edge painting the same as using colored acrylic?
No. Edge painting adds color to the cut edge after a clear acrylic part has been printed and cut. Tinted acrylic is colored throughout the sheet, so the face transparency and the appearance of printed artwork are different.
Q02Can the front stay clear while only the edge is colored?
Yes, that is the intended effect. The final appearance still depends on the transparent window, white-ink layer, artwork position and edge boundary, so approval should use a sample made from the actual production data.
Q03Can each character or SKU use a different edge color?
Yes. Because every color and SKU affects production planning and quotation, send one matrix that shows each SKU, its edge color and its quantity.
Q04Can I specify a PANTONE or DIC color?
A color code can be used as a direction and comparison reference. Perceived color can still change with acrylic thickness, background, lighting and coating density, so the physical sample should be the final approval standard.
Q05Can recesses, internal holes and narrow slots be painted?
Feasibility depends on the dimensions and geometry. Tight internal corners and deep slots affect tool access and coating uniformity, so a dimensioned cut file is required before confirmation.
Q06What files and specifications are needed for an RFQ?
Separate the print layer, white-ink layer, vector cut line, painted-edge scope and color reference. For partial edge painting, also define the start point, end point and front-versus-back interpretation.
Q07What defects should be checked before bulk production?
Review color variation, missed coverage, bleed, boundary position, corner buildup, dirt, scratches, adhesion risk and interference with the base or fittings against the approved sample.
Q08What are the MOQ, price and lead time?
They depend on size, thickness, geometry, number of colors, SKU count, quantity, packaging and required date. Send the project specifications first so feasibility, sampling scope and quotation can be evaluated without publishing an unsupported fixed promise.